
Connect to Mailchimp
Sync new Hivepass members with your Mailchimp audience and keep your mailing list up to date.
💡 Tip: Hivepass now supports sending email campaigns / newsletters and is cheaper than Mailchimp. See here.
In this article:
- 🔗 Overview
- ⚙️ Steps to connect Mailchimp
- ✅ What happens after setup
- 📥 Import existing contacts into Mailchimp
🔗 Overview
Once your Mailchimp account is connected to Hivepass, any new users who register or change their membership status will automatically be added or updated in your Mailchimp audience.

❗ This integration does not automatically import existing Hivepass contacts into Mailchim. To do that, see Import existing contacts into Mailchimp.
⚙️ Steps to connect Mailchimp
-
Go to Settings > Application Settings > Integrations and toggle Mailchimp on
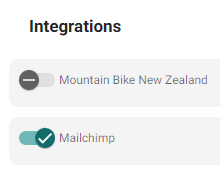
- Click Save 😉
- Then go to Settings > Mailchimp
-
Click Connect Mailchimp

-
Log in to Mailchimp and click Allow to connect Hivepass

-
Select the Mailchimp audience you want to use (e.g. "Hivepass")


⚠️ If you're using an existing audience, make sure all merge fields except email are set to optional. Otherwise, contact imports may fail.
Follow this guide: How to fix Mailchimp merge field errors
In Mailchimp, go to Audience > All Contacts > Settings > Audience fields and |MERGE| tags and ensure only the email field is marked as required.
✅ What happens after setup
- New contacts will be tagged with:
- hivepass
- hp-active or hp-inactive (based on current membership status
- If a members status changes in Hivepass it will be updated in Mailchimp
- If it does not exist in Mailchimp it will be created
- Email updates in Hivepass will also update the contact in Mailchimp
- Each contact in Mailchimp will also include a field containing their Hivepass member code
You can use these tags to target email campaigns to active members only.
📥 Import existing contacts into Mailchimp
To import current Hivepass members into Mailchimp manually:
Step 1: Export your members from Hivepass
- Log in to the Hivepass admin app and go the members page
-
Filter by Active members
-
Click Export CSV in the top right

- Rename the file:
[clubname]-active-[date].csv - Open the file in Excel or Google Sheets and keep only the name and email columns


Repeat the process for Inactive members:
- Filter by Inactive by clicking on member statuses

- Export CSV and rename to (e.g.)
[yourclubname]-inactive-[YYYY-MM-DD].csv - Edit the file in excel or google sheets to remove all columns except the name and email.
Now you'll have two CSV files: one for active, one for inactive members
Step 2. Import the files into Mailchimp
- Log in to Mailchimp
- Go to Audience > All Contacts > Add Contacts > Import Contacts
- Select Upload a file and upload your cleaned CSV (start with active members)
- Click Continue to organize
- Choose the correct audience
- ❗ Leave "Update any existing contacts" unchecked ❗
- Click Continue to tag, and add tags:
- hivepass
-
hp-active (or hp-inactive for that file)

- Click Continue to match, then Continue to subscribe
- Select Subscribed and click Finalize import
- Click Complete Import

All done 🙌