
Add a custom domain for emails
Transactional emails sent by Hivepass can now come from your organisation’s own domain, provided it has been set up and verified with Hivepass. This includes emails such as receipts, renewal reminders and other important member notifications.
In this article
- 💌 Why use a custom domain?
- 📝 Set up transactional emails for an exisiting domain
- 🔑 How to set up a new domain
- ⚙️ Advanced options
- 📊 Add DNS records to your web hosting
💌 Why use a custom domain?
- Build trust & brand recognition: Emails sent from
yourname@mail.myorg.comlook more personal and professional than default addresses likeno-reply@hivepass.app - Boost deliverability: Custom domains with verified DNS settings (SPF, DKIM, etc.) are less likely to be marked as spam.
- Full control of your communications stack: You manage your domain’s reputation and settings—all under your organisation’s brand.
📝 Set up transactional emails for an existing domain
- Go to Communications > Domains in the admin app side menu.
- Locate the domain you want to edit and click on the menu at the right hand side (three vertical dots)
- Simply select 'Use for transactional emails' here. A tick will appear under the 'Transactional' column on the Domains list page
- In this menu you can also select Edit to toggle off use for transactional emails and made simple edits to the domain, such as toggling on send from subdomain (if you have one set up).


Adding a Sender Address
- Go to Communications > Sender addresses
- Click Add sender address at the top right
- Select the correct domain from the drop down menu
- Enter your sender, and your sender name. e.g: Sender: Trails, Sender name: Trail Crew.
- Emails will be sent from Trails@hivepass.co, with Trail Crew showing as the name at the top of the email in the recipients inbox
- This sender can be set as the Default using the three dots menu at the right hand side
- This sender can be set as the Transactional emails sender under this menu also


Adding a Reply to Address
- Go to Communications >Reply-to addresses
- Click Add reply-to address at the top right
- Enter the email and display name. e.g: Email: reply@hivepass.co. Display name: Support.
- This will display in the 'to' field if the recipient hits reply. e.g: Support (reply@hivepass.co)
- This reply-to address can be set as the Default using the three dots menu at the right hand side
- This reply-to address can be set as the Transactional emails reply-to under this menu also


🔑 How to set up a new domain
- Go to Communications -> Domains in the admin app side menu.
- Select Add New Domain in the top right.
- Enter the details for your domain.
- Enter your provider, leave this blank if unknown
- Enter your domain. This will usually be the same domain that your website is on e.g. myorg.com
- Select whether you want to use this domain as the default (recommended)
- Select whether you want to use this domain for transactional emails - such as receipts, renewal reminders and other important member notifications.

If using for Transactional emails:
Follow the prompts to enter sender names and labels
- Enter a sender:
- This is the first part of the email address you will send from before the @.
- Examples
- info@myorg.com
- team@myorg.com
- membership@myorg.com
- Enter a name:
- This is what users will see in the From field of the email.
- Some suggestions:
- [your organisation name] e.g. Nelson Mountain Bike Club
- [your organisation name] Updates e.g. Rotorua Trails Trust Updates
- [your name] from [your organisation name] e.g. Sam from Queenstown MTB Club

⚙️ Advanced Options
💡 We recommended that you review these settings.

Toggle the arrow down to view the advanced settings:
- Use subdomain to send emails - this is toggled OFF by default.
- On (subdomain): Emails send from @mail.mydomain.com. To receive replies at this address, create a mailbox or a forwarder on that subdomain.
- Off (root domain) — Recommended: Emails send from @mydomain.com. Uses your existing inbox so recipients can reply normally.
- Automatic security.
- Best to leave this toggled on unless you know what you are doing.
- Custom SPF.
- What is a custom SPF, and why should I keep it enabled?
-
SPF (Sender Policy Framework) is a security setting that tells email providers which servers are allowed to send emails on behalf of your domain. It helps protect your members from spam and phishing by verifying that emails sent from your domain are legitimate.
When you enable a custom SPF in Hivepass, we automatically add Hivepass to your domain's list of approved senders. This makes it more likely your email campaigns will land in members' inboxes instead of spam folders.
-
- What is a custom SPF, and why should I keep it enabled?
🔒 Recommendation: Leave the custom SPF setting enabled unless your domain is managed by a developer or email administrator who needs to set it manually.
- Click the Add button at the bottom right to proceed to the next step.
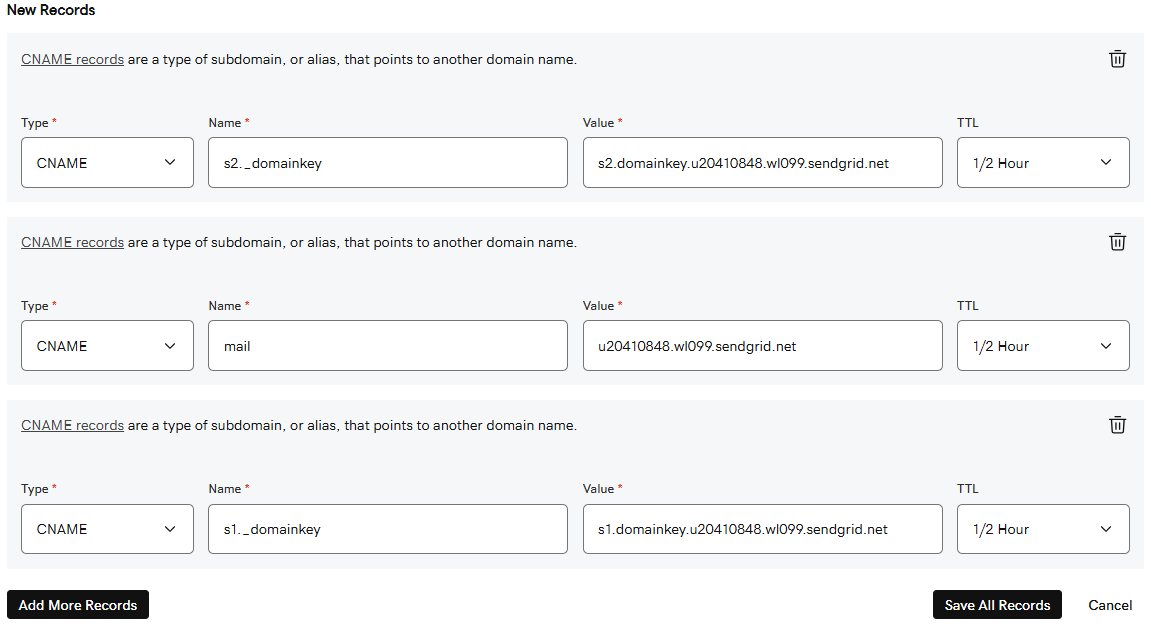
📊 Add DNS records to your web hosting
In the previous steps, you added your domain provider. Hivepass will now automatically generate DNS records for you to copy.
- Follow the instructions for your specific provider to enter the provided records into the DNS for your domain
- Copy the values by clicking the clipboard icon.

- Add the DNS records via your providers website. Example:
-
2. Back in Hivepass admin, click ‘Validate’.
-

Once validation is complete you can go to the Email Campaign page.
Create an Email Campaign.
- When creating a new campaign it will select the default domain automatically.
- You can change the domain by clicking the 'Select Domain' button.


If you have more than 1000 contacts we highly recommend you set up DMARC otherwise there is a risk of your emails being blocked by some email domains.
☝️ Need Help?
- Step-by-step DNS guides are available online for popular providers like GoDaddy, Squarespace, and Google Domains.
- Our support team is ready to assist if anything’s unclear or you need help verifying the setup.